# Javascript与QA工程师(二)
# 单元测试
# karma 单测
karma
先安装karma
npm install karma --save-dev
全局安装karma-cli
npm install karma-cli -g
初始化karma,生成karma.conf.js
karma init
初始化过程: 选择Jasmine // 双模 no PhantomJS // 无头浏览器 no
修改配置文件karma.conf.js
module.exports = function(config) {
  config.set({

    // base path that will be used to resolve all patterns (eg. files, exclude)
    // 设置路径
    basePath: '',


    // frameworks to use
    // available frameworks: https://npmjs.org/browse/keyword/karma-adapter
    // 断言库
    frameworks: ['jasmine'],


    // list of files / patterns to load in the browser
    // 合成测试文件和测试脚本添加进来
    files: ["src/**/*.js", "./unit/**/*.spec.js"],


    // list of files / patterns to exclude
    exclude: [
    ],


    // preprocess matching files before serving them to the browser
    // available preprocessors: https://npmjs.org/browse/keyword/karma-preprocessor
    // 那些东西会做覆盖率的代码检测
    preprocessors: {
    },


    // test results reporter to use
    // possible values: 'dots', 'progress'
    // available reporters: https://npmjs.org/browse/keyword/karma-reporter
    // 报告
    reporters: ['progress'],


    // web server port
    port: 9876,


    // enable / disable colors in the output (reporters and logs)
    colors: true,


    // level of logging
    // possible values: config.LOG_DISABLE || config.LOG_ERROR || config.LOG_WARN || config.LOG_INFO || config.LOG_DEBUG
    logLevel: config.LOG_INFO,


    // enable / disable watching file and executing tests whenever any file changes
    autoWatch: false,


    // start these browsers
    // available browser launchers: https://npmjs.org/browse/keyword/karma-launcher
    // 无头浏览器
    browsers: ['PhantomJS'],


    // Continuous Integration mode
    // if true, Karma captures browsers, runs the tests and exits
    // 独立运行
    singleRun: true,

    // Concurrency level
    // how many browser should be started simultaneous
    concurrency: Infinity
  })
}
2
3
4
5
6
7
8
9
10
11
12
13
14
15
16
17
18
19
20
21
22
23
24
25
26
27
28
29
30
31
32
33
34
35
36
37
38
39
40
41
42
43
44
45
46
47
48
49
50
51
52
53
54
55
56
57
58
59
60
61
62
63
64
65
66
67
68
69
70
71
72
继续安装依赖
npm install karma-jasmine jasmine-core --save-dev
npm install phantom --save-dev
在src目录下写index.js用来被测试
function add(num) {
    if (num == 1) {
        return 1;
    } else {
        return num + 1;
    }
}
2
3
4
5
6
7
在根目录创建unit文件夹用来存放测试文件,index.spec.js
describe("单元测试", function() {
    it("基础测试用例",function () {
        expect(add(2)).toBe(3);
    })
})
2
3
4
5
两者通过karma.conf.js配置文件中的 files 进行连接
执行 karma start
# karma代码覆盖率检测
安装覆盖率依赖
npm install karma karma-coverage --save-dev
修改karma.conf.js配置文件
module.exports = function(config) {
  config.set({
    ...
    // preprocess matching files before serving them to the browser
    // available preprocessors: https://npmjs.org/browse/keyword/karma-preprocessor
    // 添加代码覆盖率测试
    preprocessors: {
      "src/**/*.js": ['coverage']
    },


    // test results reporter to use
    // possible values: 'dots', 'progress'
    // available reporters: https://npmjs.org/browse/keyword/karma-reporter
    // 在reporter里添加代码覆盖率
    reporters: ['progress', 'coverage'],
    // 生成覆盖率报告文件,指定到docs目录下
    coverageReporter:{
      type: 'html',
      dir: './docs/coverage/'
    },
    ...
  })
}
2
3
4
5
6
7
8
9
10
11
12
13
14
15
16
17
18
19
20
21
22
23
24
25
再次执行 karma start
会在根目录生成一个docs文件夹
打开里面的页面会显示测试结果
结果显示覆盖率75%,说明测试用例没有完全覆盖代码

调整测试用例,将所有分支都测全
describe("单元测试", function() {
    it("基础测试用例",function () {
        expect(add(1)).toBe(1);
        expect(add(2)).toBe(3);
    })
})
2
3
4
5
6
再次运行,打开报告
覆盖率100%,完美!
# 服务接口测试
先搞一个node服务模拟接口 安装koa,起一个简单的服务 在根目录创建 service 文件夹,创建index.js
const Koa = require('koa');
const app = new Koa();

app.use(async ctx => {
    ctx.body = {
        data: "京程一灯"
    }
})

app.listen(3000);

module.exports = app;
2
3
4
5
6
7
8
9
10
11
12
安装 supertest 依赖
npm install supertest --save-dev
再创建一个 index.spec.js 测试文件
const app = require("./index");
const superagent = require('supertest');
function request() {
return superagent(app.listen());
}
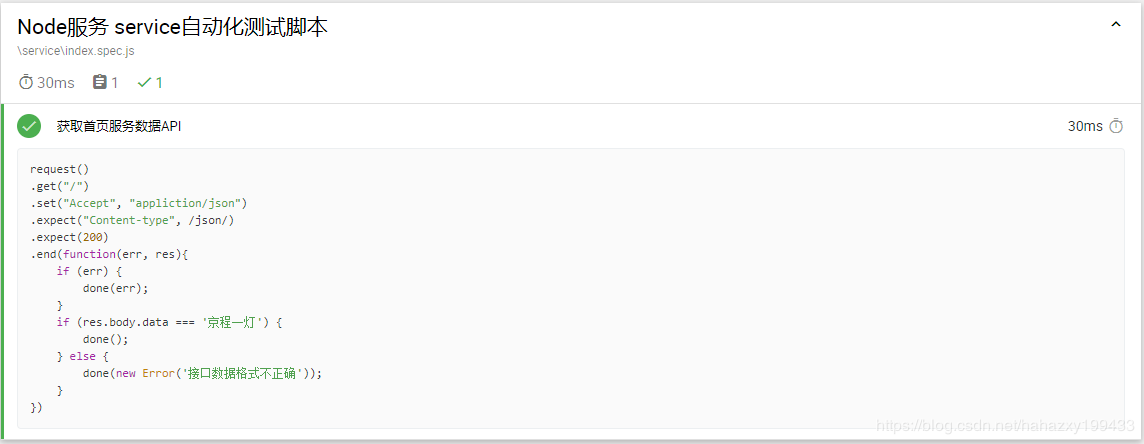
describe("Node服务 service自动化测试脚本", function () {
it("获取首页服务数据API", function(done){
request()
.get("/") // 获取根目录下内容
.set("Accept", "appliction/json") // 接收json文件
.expect("Content-type", /json/) // 断言检测类型是否是json
.expect(200) // 断言检测是否是200
.end(function(err, res){
if (err) {
done(err); // 如果是err直接抛出
}
if (res.body.data === '京程一灯') {
done(); // 如果内容正确,结束
} else {
done(new Error('接口数据格式不正确')); // 内容不正确,抛出错误
}
})
})
})
2
3
4
5
6
7
8
9
10
11
12
13
14
15
16
17
18
19
20
21
22
23
24
25
26
27
使用mocha进行接口测试(macha是一个测异步非常好用的鬼东西) 安装mocha
npm install mocha --save-dev
然后找一个好看的报表
npm install mochawesome --save-dev
根目录下创建 mochaRunner.js
const Mocha = require("mocha");
const mocha = new Mocha({
    reporter: 'mochawesome', // 添加报表报告
    reporterOptions: {
        reportDir: "./docs/mochawesome-repoter" // 报告存放位置
    }
});

mocha.addFile(
    "./service/index.spec.js" // 进行测试的执行文件
);

mocha.run(function(err) {
    if (err) {
        process.exit(1); // 1 是异常退出
    } else {
        console.log('All done');
        process.exit(0); // 0 是正常退出
    }
})
2
3
4
5
6
7
8
9
10
11
12
13
14
15
16
17
18
19
20
执行 node ./mochaRunner.js
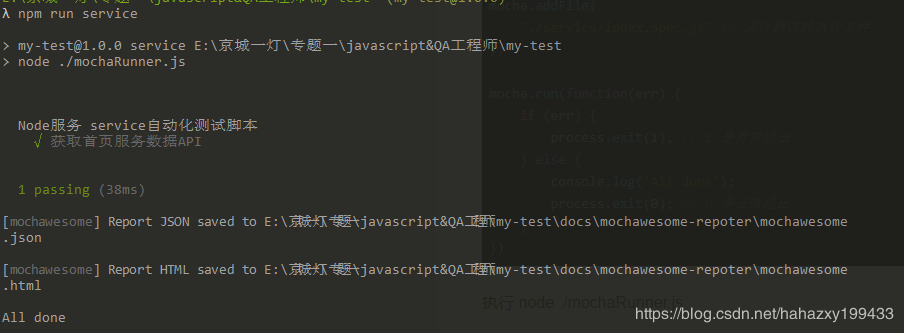 测试接口正确
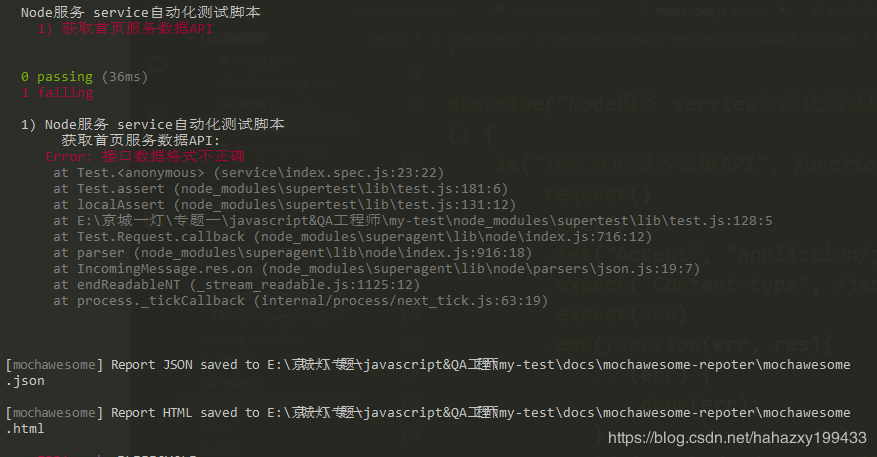
稍微修改一下判断条件,看看错误是什么样的

# e2e测试(端对端)
安装 selenium-webdriver
npm install selenium-webdriver --save-dev
在根目录创建e2e文件夹 创建index.spec.js 从官网下载对应浏览器版本的driver解压放在根目录 driver用来模拟浏览器行为来达到自动化测试的目的
const {Builder, By, Key, until} = require('selenium-webdriver');

(async function example() {
  let driver = await new Builder().forBrowser('chrome').build(); // 打开浏览器
  try {
    await driver.get('https://www.baidu.com/'); //打开百度
    await driver.findElement(By.name('wd')).sendKeys('webdriver', Key.RETURN); // 找到输入框的name 'wd', 然后输入webdriver, 按下回车
    await driver.wait(until.titleIs('webdriver_百度搜索'), 1000); // 等待1秒查看title 是否 'webdriver_百度搜索'
  } finally {
    await driver.quit(); // 关闭浏览器
  }
})();
2
3
4
5
6
7
8
9
10
11
12
执行 node ./e2e.index.spec.js 丝丝顺滑
再试试另一个鬼东西 rize puppeteer是一个无头浏览器(下载的过程比较恶心,不行就用国内镜像搞吧)
npm install rize puppeteer --save-dev
在e2e文件夹下创建github.spec.js文件
const Rize = require('rize')
const rize = new Rize()

rize
  .goto('https://github.com/')
  .type('input.header-search-input', 'node')
  .press('Enter')
  .waitForNavigation()
  .assertSee('Node.js')
  .end()  // 别忘了调用 `end` 方法来退出浏览器!
2
3
4
5
6
7
8
9
10
执行 node ./e2e/github.spec.js 行就行完事了啥也没有,不行就报错了 这谁顶得住
还有个测e2e的鬼东西叫nightwatch 但这个东西配置起来太麻烦了,了解一下就好
https://uirecorder.com/ https://nightwatchjs.org/
# UI测试
backstopjs 安装 (可能会非常慢,建议用cnpm)
npm install backstopjs -g
安装完成后,执行 backstop init
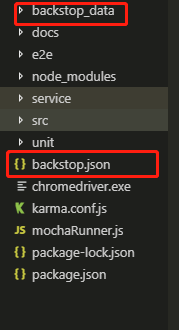
会生成一个backstop_data 文件夹和一个backstop.json
{
  "id": "qq",
  "viewports": [
    {
      "label": "phone",
      "width": 375, // 测量尺寸
      "height": 667
    },
    {
      "label": "tablet",
      "width": 1024,
      "height": 768
    }
  ],
  "onBeforeScript": "puppet/onBefore.js",
  "onReadyScript": "puppet/onReady.js",
  "scenarios": [
    {
      "label": "map", // 起个名
      "cookiePath": "backstop_data/engine_scripts/cookies.json",
      "url": "https://map.qq.com/m/", // 把项目上线的地址放在这
      "referenceUrl": "",
      "readyEvent": "",
      "readySelector": "",
      "delay": 0,
      "hideSelectors": [],
      "removeSelectors": [],
      "hoverSelector": "",
      "clickSelector": "",
      "postInteractionWait": 0,
      "selectors": [],
      "selectorExpansion": true,
      "expect": 0,
      "misMatchThreshold" : 0.1,
      "requireSameDimensions": true
    }
  ],
  "paths": {
    "bitmaps_reference": "backstop_data/bitmaps_reference", // 把UI的图放在这
    "bitmaps_test": "backstop_data/bitmaps_test", //生成的截图
    "engine_scripts": "backstop_data/engine_scripts",
    "html_report": "./docs/backstop_data/html_report", // 生成报表的地址,还是放在docs下
    "ci_report": "backstop_data/ci_report"
  },
  "report": ["browser"],
  "engine": "puppeteer",
  "engineOptions": {
    "args": ["--no-sandbox"]
  },
  "asyncCaptureLimit": 5,
  "asyncCompareLimit": 50,
  "debug": false,
  "debugWindow": false
}
2
3
4
5
6
7
8
9
10
11
12
13
14
15
16
17
18
19
20
21
22
23
24
25
26
27
28
29
30
31
32
33
34
35
36
37
38
39
40
41
42
43
44
45
46
47
48
49
50
51
52
53
54
55
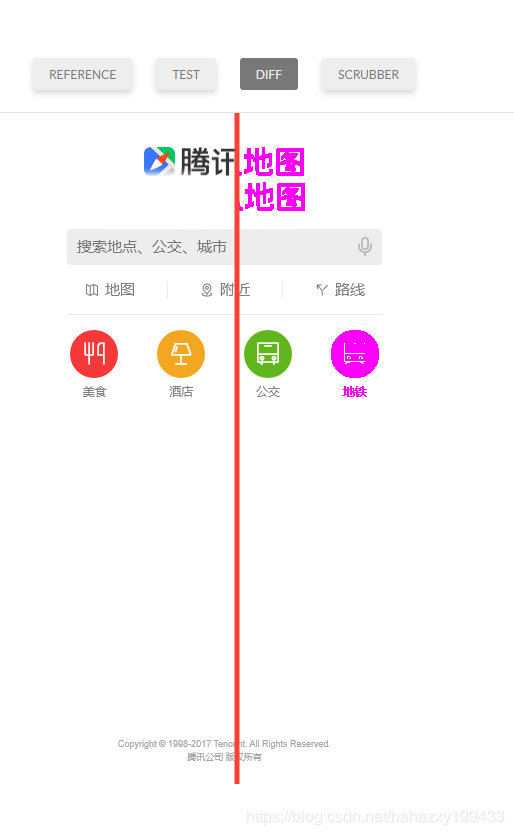
先看看这个原图是什么样的
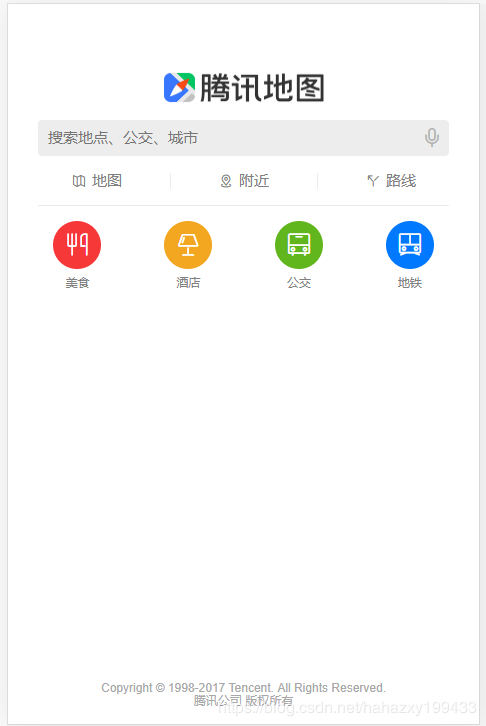
用ps稍微对它进行修改

在 backstop_data 文件夹下创建 bitmaps_reference 文件夹 把修改过的图片放在这(假装它是UI设计的图,线上测试的是我们做出来的效果) 然后执行 backstop test 会自动打开报表
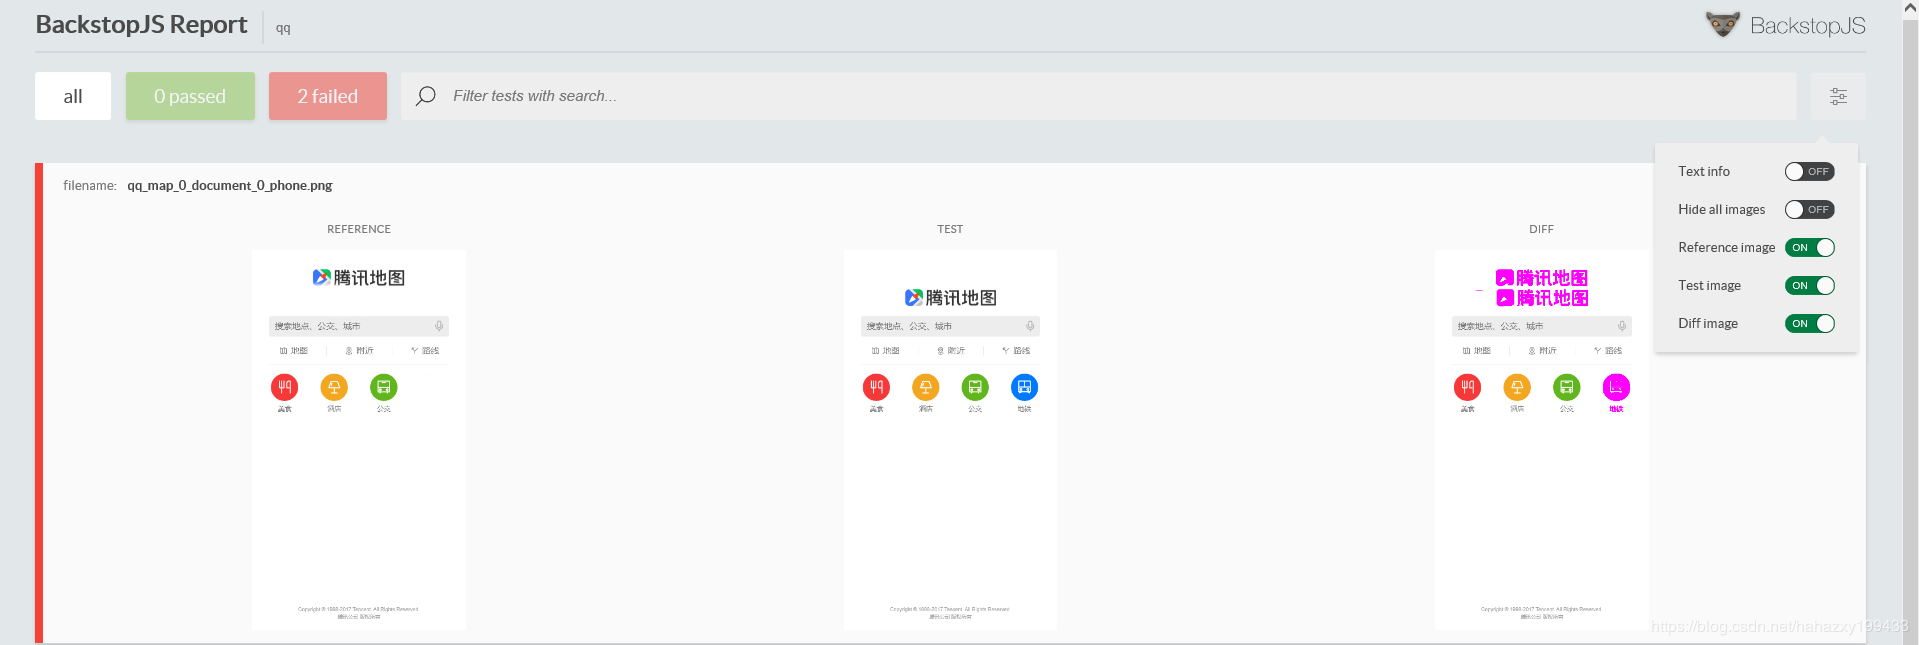
我们就可以看到我们做的图和UI设计的图有什么差别了 还可以点进去看看具体哪有差别,可以来回滑动查看