# 实战(一) webpack 环境搭建
本系列实战技术栈为 webpack + react + typescript + koa2
# 基本配置
# 1. 初始化项目
npm init -y
# 2. 安装 webpack 及相关插件
yarn add webpack webpack-cli --dev
# 3. 创建基本的目录结构
- 创建 src 文件夹
- src下创建 server 和 client 文件夹
- client 下创建 index.tsx 作为主入口
# 4. 根目录创建webpack.config.js
webpack.config.js
module.exports = {
    entry: './src/web/index.js'
}
2
3
# 5. 使用 scripty 进行命令控制
安装 scripty
yarn add scripty --dev
根目录创建 scripts-win 文件夹(如果是mac可直接创建scripts) scripts 下创建 client 文件夹 client 下创建 dev.bat prod.bat server.bat (如果是mac则对应后缀都是.sh)

将 npm 命令写入脚本:
dev.bat
webpack-dev-server --mode development
prod.bat
webpack --mode production
再在package.json 中进行配置
{
  "scripts": {
    "client:dev": "scripty",
    "client:prod": "scripty",
  },
}
2
3
4
5
6
此时再运行npm命令就可以了,此时可以测试一下简单的打包是否正常
# 6. 将webpack按照开发环境和上线环境进行配置
在根目录创建 config 文件夹 分别创建 webpack.development.js 和 webpack.production.js 暂时导出为空 开发环境配置 sourcemap
webpack.development.js
module.exports = {
    devtool: 'cheap-module-eval-source-map',
}
2
3
通过 yargs-parser 获取用户参数 通过 webpack-merge 对不同的config进行合并
安装 webpack-merge 和 yargs-parser
yarn add webpack-merge yargs-parser --dev
在webpack.config.js 中进行配置
const { resolve, join } = require('path');/* ********************** 获取path*/
const merge = require('webpack-merge');/* ************************* 合并webpack的配置文件*/
const argv = require('yargs-parser')(process.argv.slice(2));/* **** 获取执行命令的参数*/
const _mode = argv.mode || 'development';/* *********************** 获取对应的参数*/
const _mergeConfig = require(`./config/webpack.${_mode}.js`);/* *** 根据参数获取对应的webpack配置文件*/

const webpackConfig = {
    mode: _mode,
    target: 'web',
    entry: {
        app: join(__dirname, './src/client/index.tsx')
    },
}

module.exports = merge(_mergeConfig, webpackConfig);
2
3
4
5
6
7
8
9
10
11
12
13
14
15
为了方便区分不同的环境,在config中配置 env.js 文件
module.exports = {
    development: {
        publicPath: ''
    },
    production: {
        publicPath: './'
    }
}
2
3
4
5
6
7
8
# 7. 页面插入及清除
现在我们只是在dist创建html来进行测试,这很不好 所以接下来进行页面的动态插入
安装 html-webpack-plugin 和 clean-webpack-plugin
yarn add html-webpack-plugin clean-webpack-plugin --dev
分别在dev和prod环境配置 将 clean-webpack-plugin 配置在 webpack.config.js 中
webpack.development.js
const HtmlWebpackPlugin = require('html-webpack-plugin');

const webpackConfig= {
    plugins: [
        new HtmlWebpackPlugin({
            title: 'CRM系统',
            filename: 'index.html',
            template: resolve(__dirname, '../src/client/index-dev.html')
        }),
    ]
}
2
3
4
5
6
7
8
9
10
11
webpack.production.js
const HtmlWebpackPlugin = require('html-webpack-plugin');

const webpackConfig= {
    plugins: [
        new HtmlWebpackPlugin({
            title: 'CRM系统',
            filename: '../views/index.html',
            template: resolve(__dirname, '../src/client/index-prod.html'),
            minify: {
                minifyJS: true,
                removeComments: true,
                collapseWhitespace: true,
                removeAttributeQuotes: true
            }
            }),
    ]
}
2
3
4
5
6
7
8
9
10
11
12
13
14
15
16
17
这样每次重新打包的时候都会自动清除dist中的内容,然后将js 和 css 自动插入到html 中并复制到 dist
# 一些花里胡哨的配置
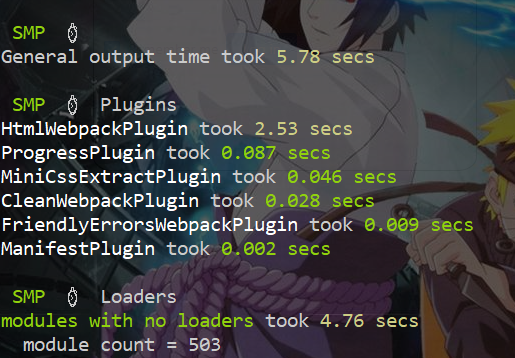
监控面板: speed-measure-webpack-plugin 在打包的时候显示出每一个loader,plugin所用的时间,来精准优化
yarn add speed-measure-webpack-plugin --dev
webpack.config.js
const SpeedMeasurePlugin = require('speed-measure-webpack-plugin');
const smp = new SpeedMeasurePlugin();

module.exports = smp.wrap(merge(_mergeConfig, webpackConfig)); // 用 smp.wrap 包裹一下
2
3
4
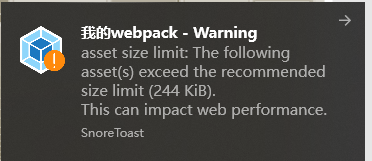
开启一个通知面板: webpack-build-notifier
yarn add webpack-build-notifier --dev
webpack.production.js
const WebpackBuildNotifierPlugin = require('webpack-build-notifier');

const webpackConfig= {
    plugins: [
        new WebpackBuildNotifierPlugin({
            title: '我的webpack',  // 可以起一个项目名字
            // logo: path.resolve('./img/favicon.png'),  // 可以找一个好看的小图标
            suppressSuccess: true // 显示成功
        })
    ]
}
2
3
4
5
6
7
8
9
10
11
12
开启打包进度:progress-bar-webpack-plugin
yarn add progress-bar-webpack-plugin --dev
webpack.config.js
const ProgressBarPlugin = require('progress-bar-webpack-plugin');

const webpackConfig= {
    plugins: [
        new ProgressBarPlugin(),
    ]
}
2
3
4
5
6
7

友好提示:friendly-errors-webpack-plugin
yarn add friendly-errors-webpack-plugin --dev
webpack.development.js
new FriendlyErrorsWebpackPlugin({
            compilationSuccessInfo: {
              messages: ['You application is running here http://localhost:3000'],
              notes: ['Some additionnal notes to be displayed unpon successful compilation']
            },
            onErrors: function (severity, errors) {
              // You can listen to errors transformed and prioritized by the plugin
              // severity can be 'error' or 'warning'
            },
            // should the console be cleared between each compilation?
            // default is true
            clearConsole: true,

            // add formatters and transformers (see below)
            additionalFormatters: [],
            additionalTransformers: []
          }),
2
3
4
5
6
7
8
9
10
11
12
13
14
15
16
17
接下来干点正事
# 各种loader
# 1. 处理处理CSS
安装 mini-css-extract-plugin 插件,用来打包css
yarn add mini-css-extract-plugin --dev
安装 postcss-loader postcss-preset-env 和 less-loader less css-loader style-loader (如果用less的话,其实用了postcss就不需要再用less了)
yarn add postcss-loader postcss-preset-env less-loader css-loader style-loader less --dev
在根目录创建 postcss.config.js
module.exports = {
    plugins: {
        'postcss-preset-env': {
            "browserslist": [
                "> 1%",
                "ie 9",
                "last 2 versions"
            ],
            stage: 0,
            features: {
                'nesting-rules': true,
                'autoprefixer': { grid: true }
            }
        }
    }
}
2
3
4
5
6
7
8
9
10
11
12
13
14
15
16
配置webpack.config.js 配置loader的时候需要注意顺序,从下到上进行解析
const MiniCSSExtractPlugin = require('mini-css-extract-plugin');
const _isDev = _mode === 'development';/* ******************************* 判断是否是开发环境 */
const cssLoaders = require('./config/cssLoaders.js')/* ***************** 引入css-loader配置 */
const baseCssLoaders = _isDev ? ['style-loader'] : [{
    loader: MiniCSSExtractPlugin.loader,
}]

const webpackConfig= {
    module:{
        rules: [
            {
                test: /\.(le|c)ss$/,
                use: [
                  ...baseCssLoaders,
                  ...cssLoaders
                ]
              },
        ]
    },
    plugins: [
        new MiniCSSExtractPlugin({
            filename: _modeflag ? 'styles/[name].[hash:5].css':'styles/[name].css',
            chunkFilename: _modeflag ? 'styles/[id].[hash:5].css':'styles/[id].css'
        }),
    ]
}
2
3
4
5
6
7
8
9
10
11
12
13
14
15
16
17
18
19
20
21
22
23
24
25
26
# 2. babel-loader
对于js文件这里统一使用babel-loader,包括后面要配置的ts、tsx等等。这里直接把react和ts都配置了。
yarn add babel-loader @babel/core @babel/preset-env @babel/preset-react @babel/preset-typescript --dev
安装 react 相关
yarn add react react-dom react-router-dom --dev
安装 typescript 相关
yarn add typescript --dev
由于使用typescript,这里还需要安装各种@types
yarn add @types/node @types/react @types/react-dom @types/react-router-dom @types/typescript --dev
安装 @babel/plugin-syntax-dynamic-import 插件语法动态导入
yarn add @babel/plugin-syntax-dynamic-import --dev
安装 @babel/plugin-transform-runtime 转换generater
yarn add @babel/plugin-transform-runtime --dev
安装antd
yarn add antd --save
配置按需加载,安装 babel-plugin-import 转换class 安装 @babel/plugin-proposal-class-properties
yarn add babel-plugin-import @babel/plugin-proposal-class-properties --dev
创建.babelrc
{
    "presets": [
        "@babel/preset-env",
        "@babel/preset-react",
        "@babel/preset-typescript"
    ],
    "plugins": [
        [
          "import",
          {
            "libraryName": "antd",
            "style": "css"
          }
        ],
        ["@babel/plugin-transform-runtime"],
        ["@babel/plugin-syntax-dynamic-import"],
        ["@babel/plugin-proposal-class-properties", {
      "loose": true
    }]
      ]
}
2
3
4
5
6
7
8
9
10
11
12
13
14
15
16
17
18
19
20
21
创建 tsconfig.json
{
    "compilerOptions": {
      "allowJs": true,
      "jsx": "react",
      "target": "es5",
      "lib": ["es6", "dom"],
      "types": ["reflect-metadata", "jest", "node"],
      "module": "commonjs",
      "moduleResolution": "node",
      "experimentalDecorators": true,
      "emitDecoratorMetadata": true,
      "baseUrl": "./src",
      "outDir": "./dist",
      "paths": {
        "@components/*": ["client/components/*"],
        "@utils/*": ["client/utils/*"],
        "@assets/*": ["client/assets"],
        "@models/*": ["client/models/*"],
        "@pages/*": ["client/pages/*"],
        "@stores/*": ["client/stores"],
      }
    },
    "include": [
      "src",
      "tests"
    ],
    "exclude": [
      "node_modules"
    ]
  }
2
3
4
5
6
7
8
9
10
11
12
13
14
15
16
17
18
19
20
21
22
23
24
25
26
27
28
29
30
这里安装一个插件
yarn add babel-plugin-dynamic-import-node --dev
webpack.config.js
const webpackConfig = {
    module: {
        rules: [
            {
                test: /\.(js|jsx|ts|tsx)$/,
                include: [resolve("src")],
                exclude: /node_modules/,
                use: {
                  loader: 'babel-loader',
                  options: {
                    plugins: _isDev ? ['dynamic-import-node'] : []
                  }
                }
              },
        ]
    },
}
2
3
4
5
6
7
8
9
10
11
12
13
14
15
16
17
# 3. 其他loader
yarn add url-loader @svgr/webpack image-webpack-loader --dev
webpack.config.js
// 图片的loader
const imageloaders = [
  {
    loader: 'url-loader',
    options: {
      limit: 10 * 1024,
      name: _isDev ? 'images/[name].[ext]' : 'images/[name].[hash:5].[ext]',
      publicPath: env.publicPath
    }
  }
]
// 上线时对图片进行压缩处理(好像也没压缩的样子)
if (!_isDev) imageloaders.push({
  loader: 'image-webpack-loader',
   options: {
        bypassOnDebug: true, // webpack@1.x
        disable: true, // webpack@2.x and newer
        },
})

const webpackConfig = {
    module: {
        rules: [
            {
                test: /.svg$/,
                use: ['@svgr/webpack', 'url-loader'],
              },
              {
                test: /\.(png|jpg|jpeg|gif|eot|woff|woff2|ttf|svg|otf)$/,
                use: imageloaders
              },
              {
                test: /\.(mp4|webm|ogg|mp3|wav|flac|aac)(\?.*)?$/,
                loader: 'url-loader',
                options: {
                  limit: 10 * 1024,
                  name: _isDev ? 'medias/[name].[ext]' : 'medias/[name].[hash:5].[ext]',
                  publicPath: env.publicPath
                }
              }
        ]
    },
}
2
3
4
5
6
7
8
9
10
11
12
13
14
15
16
17
18
19
20
21
22
23
24
25
26
27
28
29
30
31
32
33
34
35
36
37
38
39
40
41
42
43
到此为止,module 模块基本配置完成。
# 添加别名、拓展名
const webpackConfig = {
    resolve: {
        alias: {
            '@assets': resolve('src/client/assets'),
            '@components': resolve('src/client/components'),
            "@models": resolve('src/client/models'),
            '@stores': resolve('src/client/stores'),
            '@pages': resolve('src/client/pages'),
            '@utils': resolve('src/client/utils')
        },
        modules: ['node_modules', resolve('src')],
        extensions: ['.js', '.jsx', '.ts', '.tsx']
    },
}
2
3
4
5
6
7
8
9
10
11
12
13
14
# 配置output
const webpackConfig = {
    output: {
        filename: _isDev ? 'scripts/[name].js' : 'scripts/[name].[contenthash:5].js',
        path: join(__dirname, './dist/assets'),
        publicPath: env.publicPath
    },
}
2
3
4
5
6
7
# 抽离公共代码 runtime
webpack.production.js
module.exports = {
  optimization: {
    minimize: true,
    runtimeChunk: {
      name: 'manifest'
    },
    splitChunks: {
      chunks: 'async',
      minSize: 30000,
      minChunks: 1,
      maxAsyncRequests: 5,
      maxInitialRequests: 3,
      name: false,
      cacheGroups: {
        commons: {
          chunks: "initial",
          minChunks: 2,
          maxInitialRequests: 5,
          minSize: 0,
          name: "commons"
        },
        // 合并所有css
        // styles: {
        //   name: 'style',
        //   test: /\.(css|scss)$/,
        //   chunks: 'all',
        //   minChunks: 1,
        //   enforce: true
        // }
      }
    }
  },
}
2
3
4
5
6
7
8
9
10
11
12
13
14
15
16
17
18
19
20
21
22
23
24
25
26
27
28
29
30
31
32
33
# 接下来分别配置一下开发环境和上线环境的文件
开发环境 每次打包然后再看效果这样效率很低,所以安装 webpack-dev-server 启动热更新
yarn add webpack-dev-server --dev
启动热更新模块 webpack.HotModuleReplacementPlugin webpack.development.js
const {webpack} = require('webpack');
const { join } = require('path')
module.exports = {
    devServer: {
    host: '0.0.0.0',
    compress: true,
    port: '3000',
    contentBase: join(__dirname, '../dist'),
    hot: true,
    overlay: {
      errors: true,
      warnings: true
    },
    disableHostCheck: true,
    publicPath: '/',
    historyApiFallback: true,
    proxy: {
      '/api': 'http://localhost:8081'
    }
     plugins: [
        new webpack.HotModuleReplacementPlugin(),
    ]
  },
}
2
3
4
5
6
7
8
9
10
11
12
13
14
15
16
17
18
19
20
21
22
23
24
修改一下 scripts下的client/dev.bat文件
webpack-dev-server --hot --mode development
在入口文件下加上这样一句,这样在热更新的时候就不用刷新整个页面,而是只替换改变的地方
if (module.hot) {
  module.hot.dispose(function() {
    // 模块即将被替换时
    console.log("module will be replaced");
  });

  module.hot.accept(function() {
    // 模块或其依赖项之一刚刚更新时
    console.log("module update");
  });
}
2
3
4
5
6
7
8
9
10
11
上线环境 配置上线环境的webpack项主要考虑的是一些压缩合并,可以结合后面的优化部分进行
安装 webpack-parallel-uglify-plugin 进行多核打包同时对js进行压缩,不适合小项目
yarn add webpack-parallel-uglify-plugin --dev
webpack.production.js
const ParallelUglifyPlugin = require('webpack-parallel-uglify-plugin');
const os = require('os');

module.exports = {
    plugins:[
        new ParallelUglifyPlugin({
            exclude: /\.min\.js$/,
            workerCount: os.cpus().length,
            /* uglifyJS: {

            }, */
            uglifyES: {
                output: {
                    beautify:false,
                    comments: false,
                },
                compress: {
                    warnings: false,
                    drop_console: true,
                    collapse_vars: true
                }
            }
        })
    ],
}
2
3
4
5
6
7
8
9
10
11
12
13
14
15
16
17
18
19
20
21
22
23
24
25
对css进行压缩
yarn add optimize-css-assets-webpack-plugin --dev
webpack.production.js
const OptimizeCSSAssetsPlugin = require('optimize-css-assets-webpack-plugin');

module.exports = {
    plugins:[
        new OptimizeCSSAssetsPlugin({}),
    ],
}
2
3
4
5
6
7
# 添加 manifest.json
根据后面优化的内容,生成 manifest.json 用来做映射缓存,可以减少请求的资源
yarn add webpack-manifest-plugin --dev
webpack.config.js
const ManifestPlugin = require('webpack-manifest-plugin');

const webpackConfig= {
    plugins: [
        new ManifestPlugin(),
    ]
}
2
3
4
5
6
7
# 添加打包分析
开发环境分析
yarn add webpack-jarvis --dev
const Jarvis = require('webpack-jarvis');
module.exports = {
  plugins: [
    new Jarvis({ port: 1337 }),
  ]
}
2
3
4
5
6
上线环境分析
yarn add webpack-bundle-analyzer --dev
webpack.production.js
const BundleAnalyzerPlugin =  require('webpack-bundle-analyzer').BundleAnalyzerPlugin;

module.exports = {
    plugins: [
        new BundleAnalyzerPlugin(
            {
               analyzerMode: 'server',
               analyzerHost: '127.0.0.1',
               analyzerPort: 8889,
               reportFilename: 'report.html',
               defaultSizes: 'parsed',
               openAnalyzer: true,
               generateStatsFile: false,
               statsFilename: 'stats.json',
               statsOptions: null,
               logLevel: 'info'
                 }
        ),
    ]
}
2
3
4
5
6
7
8
9
10
11
12
13
14
15
16
17
18
19
20
# 添加eslint
@typescript-eslint/parser 由于eslint默认是不支持检测typescript的,我们需要安装它的扩展,让它支持typescript的语法,所以它必不可少
@typescript-eslint/eslint-plugin 但当我们有了它的功能后,我们如何设定它的规则?于是官方提供了一套规则的扩展插件,也就是它了
yarn add eslint @typescript-eslint/parser @typescript-eslint/eslint-plugin --dev
yarn add eslint-plugin-react eslint-config-alloy --dev
创建 .eslintrc.js
module.exports = {
    parser: '@typescript-eslint/parser',
    extends: [
        'alloy',
        'alloy/react',
        'alloy/typescript',
    ],
    plugins: ['@typescript-eslint', 'react'],
    "parserOptions": {
        "ecmaVersion": 6,//也就是ES6语法支持的意思
        "sourceType": "module",
        "ecmaFeatures": {
            "modules": true
        },
        "project": "./tsconfig.json"
    },
    rules: {
        'indent': ['error', 2],
        'max-len': ['error', 150],
        'react/jsx-indent': 'off',
        'react/jsx-filename-extension': [
            'error',
            {
                'extensions': [".js", ".jsx", ".ts", ".tsx"]
            }
        ],
        'react/jsx-indent-props': ['error', 2],
        'object-curly-spacing': ['off', "never"],
        'no-console': 'off',
        'linebreak-style': 'off',
        'react/jsx-tag-spacing': 'off',
        'react/jsx-one-expression-per-line': 'off',
        'import/no-unresolved': 1,
        'jsx-a11y/click-events-have-key-events': 0,
        'jsx-a11y/no-static-element-interactions': 0,
        'react/prop-types': 0,
        'jsx-a11y/no-noninteractive-element-interactions': 0,
        'no-restricted-syntax': 0,
        'guard-for-in': 0,
        '@typescript-eslint/member-ordering':0,
        '@typescript-eslint/explicit-member-accessibility':0,
        '@typescript-eslint/no-require-imports':0,
        'import/no-unresolved':0,
        // 禁止使用 var
        'no-var': "error",
        // 优先使用 interface 而不是 type
        '@typescript-eslint/consistent-type-definitions': [
            "error",
            "interface"
        ]
    }
}
2
3
4
5
6
7
8
9
10
11
12
13
14
15
16
17
18
19
20
21
22
23
24
25
26
27
28
29
30
31
32
33
34
35
36
37
38
39
40
41
42
43
44
45
46
47
48
49
50
51
52
创建 .eslintignore ,添加忽略文件
dist
node_modules
config
*.js
scripts-win
2
3
4
5
6
安装 eslint-loader
yarn add eslint-loader --dev
webpack.config.js 中配置。
注意:eslint-loader要放在下面,因为loader是从下往上引用的,如果先走了babel-loader的话,em......很酸爽
const webpackConfig = {
    module: {
        rules: [
            {
                test: /\.(js|jsx|ts|tsx)$/,
                include: [resolve("src")],
                exclude: /node_modules/,
                use: [
                    {
                        loader: 'babel-loader',
                        options: {
                            plugins: _isDev ? ['dynamic-import-node'] : []
                        }
                    },
                    'eslint-loader']
            },
        ]
    },
}
2
3
4
5
6
7
8
9
10
11
12
13
14
15
16
17
18
19
# 优化
# 开发阶段
# 1. 开启多核压缩
yarn add uglifyjs-webpack-plugin --dev
webpack.production.js
const UglifyJsPlugin = require('uglifyjs-webpack-plugin');

module.exports = {
    optimization: {
        minimizer: [new UglifyJsPlugin({
            parallel: true
        })]
    }
}
2
3
4
5
6
7
8
9
但是这个使用的时候会报错,好像是不能转es6的问题 代替方案是 terser-webpack-plugin
const TerserPlugin = require('terser-webpack-plugin')

module.exports = {
    optimization: {
        minimizer: [
            new TerserPlugin({
                parallel: true,
                terserOptions: {
                    ecma: 6,
                },
            }),
        ]
    }
}
2
3
4
5
6
7
8
9
10
11
12
13
14
# 2. 监控面板
在打包的时候显示出每一个loader,plugin所用的时间,来精准优化
yarn add speed-measure-webpack-plugin --dev
webpack.config.js
const SpeedMeasurePlugin = require('speed-measure-webpack-plugin');
const smp = new SpeedMeasurePlugin();
//............
// 用smp.warp()包裹一下合并的config
module.exports = smp.wrap(merge(_mergeConfig, webpackConfig));
2
3
4
5
# 3. 开启一个通知面板
yarn add webpack-build-notifier --dev
webpack.config.js
const WebpackBuildNotifierPlugin = require('webpack-build-notifier');

const webpackConfig= {
    plugins: [
        new WebpackBuildNotifierPlugin({
            title: '我的webpack',
            // logo: path.resolve('./img/favicon.png'),
            suppressSuccess: true
        })
    ]
}
2
3
4
5
6
7
8
9
10
11
12
# 4. 开启打包进度
yarn add progress-bar-webpack-plugin --dev
webpack.config.js
const ProgressBarPlugin = require('progress-bar-webpack-plugin');

const webpackConfig= {
    plugins: [
        new ProgressBarPlugin(),
    ]
}
2
3
4
5
6
7
# 5. 开发面板更清晰
yarn add webpack-dashboard --dev
webpack.config.js
const DashboardPlugin = require('webpack-dashboard/plugin');

const webpackConfig= {
    plugins: [
        new DashboardPlugin()
        ]
}
2
3
4
5
6
7
package.json
{
  "scripts": {
    "dev": "webpack-dashboard webpack --mode development",
  },
}
2
3
4
5
6
# 6. 开启窗口的标题
这个包mac的item用有效果,windows暂时没看到效果
node-bash-title
webpack.config.js
const setTitle = require('node-bash-title');
setTitle('server');
2
# 7. friendly-errors-webpack-plugin
yarn add friendly-errors-webpack-plugin --dev
new FriendlyErrorsWebpackPlugin({
            compilationSuccessInfo: {
              messages: ['You application is running here http://localhost:3000'],
              notes: ['Some additionnal notes to be displayed unpon successful compilation']
            },
            onErrors: function (severity, errors) {
              // You can listen to errors transformed and prioritized by the plugin
              // severity can be 'error' or 'warning'
            },
            // should the console be cleared between each compilation?
            // default is true
            clearConsole: true,

            // add formatters and transformers (see below)
            additionalFormatters: [],
            additionalTransformers: []
          }),
2
3
4
5
6
7
8
9
10
11
12
13
14
15
16
17
# 上线阶段
# 1. es6不需要编译
# 2. 前端缓存小负载
a.js -> a.xxx.js
a.xxx.js -> 代码 后台每次计算出当前包
会在dist中生成一个manifest.json文件,用来缓存
const ManifestPlugin = require('webpack-manifest-plugin');

const webpackConfig= {
    plugins: [
        new ManifestPlugin(),
    ]
}
2
3
4
5
6
7
# 3. 加loading
<body>
    <div id="app">
        <%= htmlWebpackPlugin.options.loading.html %>
    </div>
</body>
2
3
4
5
webpack.config.js
const loading = {
    html: '加载中。。。'
}

const webpackConfig= {
    plugins: [
        new HtmlWebpackPlugin({
            filename:'index.html',
            template:'src/index.html',
            loading
        }),
    ]
}
2
3
4
5
6
7
8
9
10
11
12
13
14
在sync.js中添加个延迟效果
// import lodash from 'lodash-es';
import {isArray} from 'lodash-es';
import item from './sync.css';
import help from '../common/help.js';
const sync = function() {
    console.log('sync');

    fetch('/api/test')
    .then(response => response.json())
    .then(data => {
        console.log('fetch结果', data.message);
    })
    setTimeout(function() {
        document.getElementById('app').innerHTML = `<h1 class="${item.test}">hello Yideng Webpack</h1>`
    }, 2000)

}
const isArrayFun = function(args) {
    console.log(isArray(args));
}
export {
    sync,
    isArrayFun
}
2
3
4
5
6
7
8
9
10
11
12
13
14
15
16
17
18
19
20
21
22
23
24
# 4. 单页 问题 多页转单页 webapp 性能 请求的数量 runtime
# 5. 分析打包结果
跟CI绑定的一个包,没试过
yarn add bundlesize --dev
在 package.json 中添加script,运行后会生成一个stats.json文件
"chart": "webpack --mode development --profile --ison > stats.json",
但是有一点需要注意,把之前加优化界面的一些花里胡哨的东西都注释掉, 在github上找到webpack-chart http://alexkuz.github.io/webpack-chart/ 将stats.json放进去进行分析
或者在 http://webpack.github.io/analyse/ 也可以,只不过比较粗犷
# 6. test exculde include 非常重要,每个loader都设置的话webpack会很快
# 7. 压缩 JS CSS
用了这个就不用刚才的 terser-webpack-plugin了 这个包跟webpack自己的压缩相比较,项目小的时候webpack自己的压缩比较好用,项目大的时候再调用多核会好一些
yarn add webpack-parallel-uglify-plugin --dev
webpack.production.js
// const UglifyJsPlugin = require('uglifyjs-webpack-plugin');
const TerserPlugin = require('terser-webpack-plugin');
const ParallelUglifyPlugin = require('webpack-parallel-uglify-plugin');
const os = require('os');
module.exports = {
    output:{
        filename: 'script/[name].[hash:5].bundles.js',
        publicPath:'/'
    },
    plugins:[
        new ParallelUglifyPlugin({
            exclude: /\.min\.js$/,
            workerCount: os.cpus().length,
            /* uglifyJS: {

            }, */
            uglifyES: {
                output: {
                    beautify:false,
                    comments: false,
                },
                compress: {
                    warnings: false,
                    drop_console: true,
                    collapse_vars: true
                }
            }
        })
    ],
}
2
3
4
5
6
7
8
9
10
11
12
13
14
15
16
17
18
19
20
21
22
23
24
25
26
27
28
29
30
31
压缩css
yarn add optimize-css-assets-webpack-plugin --dev
或者用nano