# 使用卷积神经网络识别手写数字任务
# 加载 MNIST 数据集
在根目录建 data 文件夹,将雪碧图和文件放进 mnist 文件夹下
使用 http-server 启动服务(带上 --cors 参数避免跨域)
http-server data --cors
1
data.js
/**
 * @license
 * Copyright 2018 Google LLC. All Rights Reserved.
 * Licensed under the Apache License, Version 2.0 (the "License");
 * you may not use this file except in compliance with the License.
 * You may obtain a copy of the License at
 *
 * http://www.apache.org/licenses/LICENSE-2.0
 *
 * Unless required by applicable law or agreed to in writing, software
 * distributed under the License is distributed on an "AS IS" BASIS,
 * WITHOUT WARRANTIES OR CONDITIONS OF ANY KIND, either express or implied.
 * See the License for the specific language governing permissions and
 * limitations under the License.
 * =============================================================================
 */

import * as tf from "@tensorflow/tfjs";

const IMAGE_SIZE = 784;
const NUM_CLASSES = 10;
const NUM_DATASET_ELEMENTS = 65000;

const TRAIN_TEST_RATIO = 5 / 6;

const NUM_TRAIN_ELEMENTS = Math.floor(TRAIN_TEST_RATIO * NUM_DATASET_ELEMENTS);
const NUM_TEST_ELEMENTS = NUM_DATASET_ELEMENTS - NUM_TRAIN_ELEMENTS;

const MNIST_IMAGES_SPRITE_PATH = "http://127.0.0.1:8080/mnist/mnist_images.png";
const MNIST_LABELS_PATH = "http://127.0.0.1:8080/mnist/mnist_labels_uint8";

/**
 * A class that fetches the sprited MNIST dataset and returns shuffled batches.
 *
 * NOTE: This will get much easier. For now, we do data fetching and
 * manipulation manually.
 */
export class MnistData {
  constructor() {
    this.shuffledTrainIndex = 0;
    this.shuffledTestIndex = 0;
  }

  async load() {
    // Make a request for the MNIST sprited image.
    const img = new Image();
    const canvas = document.createElement("canvas");
    const ctx = canvas.getContext("2d");
    const imgRequest = new Promise((resolve, reject) => {
      img.crossOrigin = "";
      img.onload = () => {
        img.width = img.naturalWidth;
        img.height = img.naturalHeight;

        const datasetBytesBuffer = new ArrayBuffer(
          NUM_DATASET_ELEMENTS * IMAGE_SIZE * 4
        );

        const chunkSize = 5000;
        canvas.width = img.width;
        canvas.height = chunkSize;

        for (let i = 0; i < NUM_DATASET_ELEMENTS / chunkSize; i++) {
          const datasetBytesView = new Float32Array(
            datasetBytesBuffer,
            i * IMAGE_SIZE * chunkSize * 4,
            IMAGE_SIZE * chunkSize
          );
          ctx.drawImage(
            img,
            0,
            i * chunkSize,
            img.width,
            chunkSize,
            0,
            0,
            img.width,
            chunkSize
          );

          const imageData = ctx.getImageData(0, 0, canvas.width, canvas.height);

          for (let j = 0; j < imageData.data.length / 4; j++) {
            // All channels hold an equal value since the image is grayscale, so
            // just read the red channel.
            datasetBytesView[j] = imageData.data[j * 4] / 255;
          }
        }
        this.datasetImages = new Float32Array(datasetBytesBuffer);

        resolve();
      };
      img.src = MNIST_IMAGES_SPRITE_PATH;
    });

    const labelsRequest = fetch(MNIST_LABELS_PATH);
    const [imgResponse, labelsResponse] = await Promise.all([
      imgRequest,
      labelsRequest
    ]);

    this.datasetLabels = new Uint8Array(await labelsResponse.arrayBuffer());

    // Create shuffled indices into the train/test set for when we select a
    // random dataset element for training / validation.
    this.trainIndices = tf.util.createShuffledIndices(NUM_TRAIN_ELEMENTS);
    this.testIndices = tf.util.createShuffledIndices(NUM_TEST_ELEMENTS);

    // Slice the the images and labels into train and test sets.
    this.trainImages = this.datasetImages.slice(
      0,
      IMAGE_SIZE * NUM_TRAIN_ELEMENTS
    );
    this.testImages = this.datasetImages.slice(IMAGE_SIZE * NUM_TRAIN_ELEMENTS);
    this.trainLabels = this.datasetLabels.slice(
      0,
      NUM_CLASSES * NUM_TRAIN_ELEMENTS
    );
    this.testLabels = this.datasetLabels.slice(
      NUM_CLASSES * NUM_TRAIN_ELEMENTS
    );
  }

  nextTrainBatch(batchSize) {
    return this.nextBatch(
      batchSize,
      [this.trainImages, this.trainLabels],
      () => {
        this.shuffledTrainIndex =
          (this.shuffledTrainIndex + 1) % this.trainIndices.length;
        return this.trainIndices[this.shuffledTrainIndex];
      }
    );
  }

  nextTestBatch(batchSize) {
    return this.nextBatch(batchSize, [this.testImages, this.testLabels], () => {
      this.shuffledTestIndex =
        (this.shuffledTestIndex + 1) % this.testIndices.length;
      return this.testIndices[this.shuffledTestIndex];
    });
  }

  nextBatch(batchSize, data, index) {
    const batchImagesArray = new Float32Array(batchSize * IMAGE_SIZE);
    const batchLabelsArray = new Uint8Array(batchSize * NUM_CLASSES);

    for (let i = 0; i < batchSize; i++) {
      const idx = index();

      const image = data[0].slice(
        idx * IMAGE_SIZE,
        idx * IMAGE_SIZE + IMAGE_SIZE
      );
      batchImagesArray.set(image, i * IMAGE_SIZE);

      const label = data[1].slice(
        idx * NUM_CLASSES,
        idx * NUM_CLASSES + NUM_CLASSES
      );
      batchLabelsArray.set(label, i * NUM_CLASSES);
    }

    const xs = tf.tensor2d(batchImagesArray, [batchSize, IMAGE_SIZE]);
    const labels = tf.tensor2d(batchLabelsArray, [batchSize, NUM_CLASSES]);

    return { xs, labels };
  }
}
1
2
3
4
5
6
7
8
9
10
11
12
13
14
15
16
17
18
19
20
21
22
23
24
25
26
27
28
29
30
31
32
33
34
35
36
37
38
39
40
41
42
43
44
45
46
47
48
49
50
51
52
53
54
55
56
57
58
59
60
61
62
63
64
65
66
67
68
69
70
71
72
73
74
75
76
77
78
79
80
81
82
83
84
85
86
87
88
89
90
91
92
93
94
95
96
97
98
99
100
101
102
103
104
105
106
107
108
109
110
111
112
113
114
115
116
117
118
119
120
121
122
123
124
125
126
127
128
129
130
131
132
133
134
135
136
137
138
139
140
141
142
143
144
145
146
147
148
149
150
151
152
153
154
155
156
157
158
159
160
161
162
163
164
165
166
167
168
169
import * as tf from "@tensorflow/tfjs";
import * as tfvis from "@tensorflow/tfjs-vis";
import { MnistData } from "./data";

window.onload = async () => {
  const data = new MnistData();
  // 加载图片的过程
  await data.load();
  // 加载验证集
  const examples = data.nextTestBatch(20);

  console.log(examples);
};
1
2
3
4
5
6
7
8
9
10
11
12
13
2
3
4
5
6
7
8
9
10
11
12
13
输出一下 examples
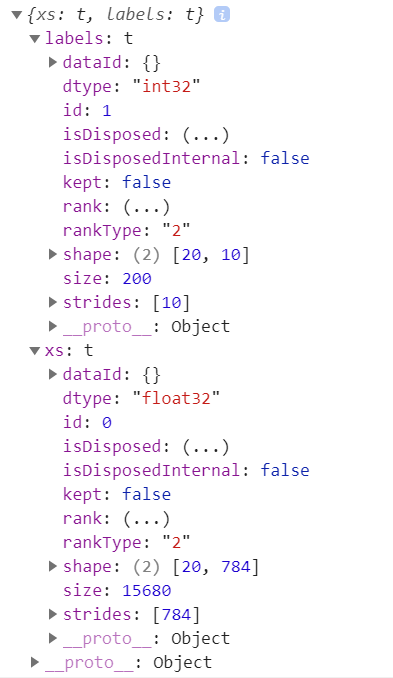
examples 对象有两个值 labels 和 xs
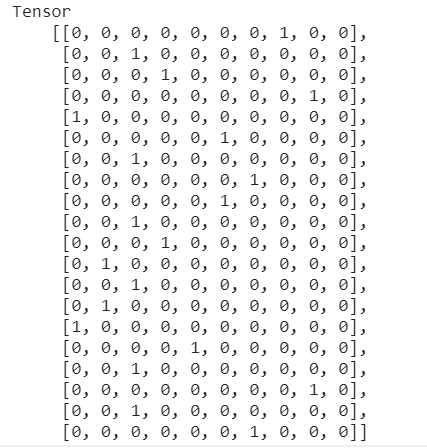
labels 的 shape 是 [20, 10],20 代表 20 组数据,10 则是 0 到 9 的数字位数,输出一下看看
xs 的 shape 则是 [20, 784] ,20 代表 20 组数据,784 则是 28 _ 28 _ 1 ,代表的是像素点,这个图片的大小就是 28*28,1 是因为是黑白图片
import * as tf from "@tensorflow/tfjs";
import * as tfvis from "@tensorflow/tfjs-vis";
import { MnistData } from "./data";
window.onload = async () => {
const data = new MnistData();
// 加载图片的过程
await data.load();
// 加载验证集
const examples = data.nextTestBatch(20);
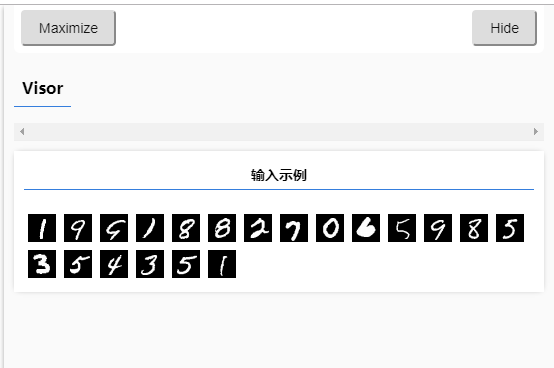
// 搞一个放置绘图区,将数据显示出来
const surface = tfvis.visor().surface({ name: "输入示例" });
// 循环将里面的图片切出来
for (let i = 0; i < 20; i++) {
// tf.tidy() 方法是因为,处理图片过程中调用了GPU加速,webgloble中会留有tensor缓存
// 为了防止数量太大造成内存泄漏,使用tidy清理一下
const imageTensor = tf.tidy(() => {
// slice方法用来切割tensor 第一个参数是起始位置,[1, 0]代表着第一层数组的第1个,第2层数组的第0个,
// 第二个参数则是切割长度 [1, 784]代表第一层数组切割一个长度,第二层数组切割784个
return (
examples.xs
.slice([i, 0], [1, 784])
// 最后要转换为2d或3d tensor图片
.reshape([28, 28, 1])
);
});
const canvas = document.createElement("canvas");
canvas.width = 28;
canvas.height = 28;
canvas.style = "margin: 4px";
// 最后需要把图片tensor转化为像素,第一个参数就是图片tensor,第二个就是canvas画布
await tf.browser.toPixels(imageTensor, canvas);
surface.drawArea.appendChild(canvas);
}
};
1
2
3
4
5
6
7
8
9
10
11
12
13
14
15
16
17
18
19
20
21
22
23
24
25
26
27
28
29
30
31
32
33
34
35
36
2
3
4
5
6
7
8
9
10
11
12
13
14
15
16
17
18
19
20
21
22
23
24
25
26
27
28
29
30
31
32
33
34
35
36
# 定义模型结构:卷积神经网络
# 为什么要用卷积神经网络
- 图片数据量大,运算量大,200 _ 200 _ 3 = 120000
- 卷积神经网络模拟人类的视觉处理流程,高效提取特征
# 卷积神经网络的层
卷积层
- 使用多个卷积核对图像进行卷积操作
- 卷积层有权重需要训练,卷积核就是权重
池化层
- 最大池化层用于提取最强的特征
- 扩大感受野,减少计算量
- 池化层没有权重需要训练
全连接层
- 作为输出层
- 作为分类器
- 全连接层有权重需要训练
import * as tf from "@tensorflow/tfjs";
import * as tfvis from "@tensorflow/tfjs-vis";
import { MnistData } from "./data";

window.onload = async () => {
  const data = new MnistData();
  // 加载图片的过程
  await data.load();
  // 加载验证集
  const examples = data.nextTestBatch(20);
  const surface = tfvis.visor().surface({ name: "输入示例" });
  // 循环将里面的图片切出来
  for (let i = 0; i < 20; i++) {
    // tf.tidy() 方法是因为,处理图片过程中调用了GPU加速,webgloble中会留有tensor缓存
    // 为了防止数量太大造成内存泄漏,使用tidy清理一下
    const imageTensor = tf.tidy(() => {
      // slice方法用来切割tensor 第一个参数是起始位置,[1, 0]代表着第一层数组的第1个,第2层数组的第0个,
      // 第二个参数则是切割长度 [1, 784]代表第一层数组切割一个长度,第二层数组切割784个
      return (
        examples.xs
          .slice([i, 0], [1, 784])
          // 最后要转换为2d或3d tensor图片
          .reshape([28, 28, 1])
      );
    });

    const canvas = document.createElement("canvas");
    canvas.width = 28;
    canvas.height = 28;
    canvas.style = "margin: 4px";
    // 最后需要把图片tensor转化为像素,第一个参数就是图片tensor,第二个就是canvas画布
    await tf.browser.toPixels(imageTensor, canvas);
    surface.drawArea.appendChild(canvas);
  }

  const model = tf.sequential();

  // 添加卷积神经网络层
  model.add(
    tf.layers.conv2d({
      inputShape: [28, 28, 1],
      // 卷积大小
      kernelSize: 5,
      filters: 8,
      // 移动步长
      strides: 1,
      // relu激活函数可以去除一些不常用的特征
      activation: "relu",
      // 初始化卷积核,减少计算
      kernelInitializer: "varianceScaling"
    })
  );

  // 添加池化层
  model.add(
    tf.layers.maxPool2d({
      poolSize: [2, 2],
      strides: [2, 2]
    })
  );

  // 再添加一个特征值
  model.add(
    tf.layers.conv2d({
      // 卷积大小
      kernelSize: 5,
      filters: 16,
      // 移动步长
      strides: 1,
      // relu激活函数可以去除一些不常用的特征
      activation: "relu",
      // 初始化卷积核,减少计算
      kernelInitializer: "varianceScaling"
    })
  );
  model.add(
    tf.layers.maxPool2d({
      poolSize: [2, 2],
      strides: [2, 2]
    })
  );

  // 因为用了很多filter,所以提取了很多特征值,要把它搞成一维的
  model.add(tf.layers.flatten());
  model.add(
    tf.layers.dense({
      units: 10,
      activation: "softmax",
      kernelInitializer: "varianceScaling"
    })
  );
};
1
2
3
4
5
6
7
8
9
10
11
12
13
14
15
16
17
18
19
20
21
22
23
24
25
26
27
28
29
30
31
32
33
34
35
36
37
38
39
40
41
42
43
44
45
46
47
48
49
50
51
52
53
54
55
56
57
58
59
60
61
62
63
64
65
66
67
68
69
70
71
72
73
74
75
76
77
78
79
80
81
82
83
84
85
86
87
88
89
90
91
92
2
3
4
5
6
7
8
9
10
11
12
13
14
15
16
17
18
19
20
21
22
23
24
25
26
27
28
29
30
31
32
33
34
35
36
37
38
39
40
41
42
43
44
45
46
47
48
49
50
51
52
53
54
55
56
57
58
59
60
61
62
63
64
65
66
67
68
69
70
71
72
73
74
75
76
77
78
79
80
81
82
83
84
85
86
87
88
89
90
91
92
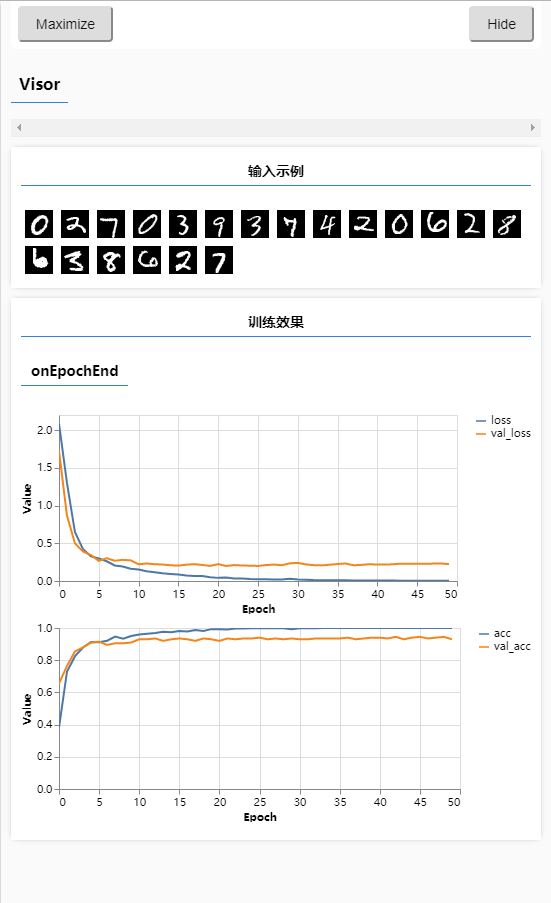
# 训练模型
import * as tf from '@tensorflow/tfjs';
import * as tfvis from '@tensorflow/tfjs-vis'
import { MnistData } from './data';

window.onload = async () => {
    const data = new MnistData();
    // 加载图片的过程
    await data.load();
    // 加载验证集
    const examples = data.nextTestBatch(20);
    const surface = tfvis.visor().surface({ name: '输入示例' });
    // 循环将里面的图片切出来
    for (let i = 0; i < 20; i++) {
        // tf.tidy() 方法是因为,处理图片过程中调用了GPU加速,webgloble中会留有tensor缓存
        // 为了防止数量太大造成内存泄漏,使用tidy清理一下
        const imageTensor = tf.tidy(() => {
            // slice方法用来切割tensor 第一个参数是起始位置,[1, 0]代表着第一层数组的第1个,第2层数组的第0个,
            // 第二个参数则是切割长度 [1, 784]代表第一层数组切割一个长度,第二层数组切割784个
            return examples.xs
                .slice([i, 0], [1, 784])
                // 最后要转换为2d或3d tensor图片
                .reshape([28, 28, 1])
        })

        const canvas = document.createElement('canvas');
        canvas.width = 28;
        canvas.height = 28;
        canvas.style = "margin: 4px";
        // 最后需要把图片tensor转化为像素,第一个参数就是图片tensor,第二个就是canvas画布
        await tf.browser.toPixels(imageTensor, canvas);
        surface.drawArea.appendChild(canvas);
    }

    const model = tf.sequential();

    // 添加卷积神经网络层
    model.add(tf.layers.conv2d({
        inputShape: [28, 28, 1],
        // 卷积大小
        kernelSize: 5,
        filters: 8,
        // 移动步长
        strides: 1,
        // relu激活函数可以去除一些不常用的特征
        activation: 'relu',
        // 初始化卷积核,减少计算
        'kernelInitializer': 'varianceScaling'
    }))

    // 添加池化层
    model.add(tf.layers.maxPool2d({
        poolSize: [2, 2],
        strides: [2, 2]
    }))

    // 再添加一个特征值
    model.add(tf.layers.conv2d({
        // 卷积大小
        kernelSize: 5,
        filters: 16,
        // 移动步长
        strides: 1,
        // relu激活函数可以去除一些不常用的特征
        activation: 'relu',
        // 初始化卷积核,减少计算
        'kernelInitializer': 'varianceScaling'
    }))
    model.add(tf.layers.maxPool2d({
        poolSize: [2, 2],
        strides: [2, 2]
    }))

    // 因为用了很多filter,所以提取了很多特征值,要把它搞成一维的
    model.add(tf.layers.flatten());
    model.add(tf.layers.dense({
        units: 10,
        activation: 'softmax',
        kernelInitializer: 'varianceScaling'
    }))

    // 添加损失函数和优化器
    model.compile({
        loss: 'categoricalCrossentropy',
        optimizer: tf.train.adam(),
        metrics: 'accuracy'
    })

    // 准备训练集
    const [trainXs, trainYs] = tf.tidy(() => {
        const d = data.nextTrainBatch(1000);
        return [
            d.xs.reshape([1000, 28, 28, 1]),
            d.labels,
        ]
    })

    // 准备验证集
    const [testXs, testYs] = tf.tidy(() => {
        const d = data.nextTrainBatch(200);
        return [
            d.xs.reshape([200, 28, 28, 1]),
            d.labels,
        ]
    })

    await model.fit(trainXs, trainYs, {
        validationData: [testXs, testYs],
        epochs: 50,
        callbacks: tfvis.show.fitCallbacks(
            {name: '训练效果'},
            ['loss', 'val_loss', 'acc', 'val_acc'],
            {callbacks: ['onEpochEnd']}
        )
    });

}
1
2
3
4
5
6
7
8
9
10
11
12
13
14
15
16
17
18
19
20
21
22
23
24
25
26
27
28
29
30
31
32
33
34
35
36
37
38
39
40
41
42
43
44
45
46
47
48
49
50
51
52
53
54
55
56
57
58
59
60
61
62
63
64
65
66
67
68
69
70
71
72
73
74
75
76
77
78
79
80
81
82
83
84
85
86
87
88
89
90
91
92
93
94
95
96
97
98
99
100
101
102
103
104
105
106
107
108
109
110
111
112
113
114
115
116
# 预测
import * as tf from '@tensorflow/tfjs';
import * as tfvis from '@tensorflow/tfjs-vis'
import { MnistData } from './data';
window.onload = async () => {
const data = new MnistData();
// 加载图片的过程
await data.load();
// 加载验证集
const examples = data.nextTestBatch(100);
const surface = tfvis.visor().surface({ name: '输入示例' });
// 循环将里面的图片切出来
for (let i = 0; i < 20; i++) {
// tf.tidy() 方法是因为,处理图片过程中调用了GPU加速,webgloble中会留有tensor缓存
// 为了防止数量太大造成内存泄漏,使用tidy清理一下
const imageTensor = tf.tidy(() => {
// slice方法用来切割tensor 第一个参数是起始位置,[1, 0]代表着第一层数组的第1个,第2层数组的第0个,
// 第二个参数则是切割长度 [1, 784]代表第一层数组切割一个长度,第二层数组切割784个
return examples.xs
.slice([i, 0], [1, 784])
// 最后要转换为2d或3d tensor图片
.reshape([28, 28, 1])
})
const canvas = document.createElement('canvas');
canvas.width = 28;
canvas.height = 28;
canvas.style = "margin: 4px";
// 最后需要把图片tensor转化为像素,第一个参数就是图片tensor,第二个就是canvas画布
await tf.browser.toPixels(imageTensor, canvas);
surface.drawArea.appendChild(canvas);
}
const model = tf.sequential();
// 添加卷积神经网络层
model.add(tf.layers.conv2d({
inputShape: [28, 28, 1],
// 卷积大小
kernelSize: 5,
filters: 8,
// 移动步长
strides: 1,
// relu激活函数可以去除一些不常用的特征
activation: 'relu',
// 初始化卷积核,减少计算
'kernelInitializer': 'varianceScaling'
}))
// 添加池化层
model.add(tf.layers.maxPool2d({
poolSize: [2, 2],
strides: [2, 2]
}))
// 再添加一个特征值
model.add(tf.layers.conv2d({
// 卷积大小
kernelSize: 5,
filters: 16,
// 移动步长
strides: 1,
// relu激活函数可以去除一些不常用的特征
activation: 'relu',
// 初始化卷积核,减少计算
'kernelInitializer': 'varianceScaling'
}))
model.add(tf.layers.maxPool2d({
poolSize: [2, 2],
strides: [2, 2]
}))
// 因为用了很多filter,所以提取了很多特征值,要把它搞成一维的
model.add(tf.layers.flatten());
model.add(tf.layers.dense({
units: 10,
activation: 'softmax',
kernelInitializer: 'varianceScaling'
}))
// 添加损失函数和优化器
model.compile({
loss: 'categoricalCrossentropy',
optimizer: tf.train.adam(),
metrics: 'accuracy'
})
// 准备训练集
const [trainXs, trainYs] = tf.tidy(() => {
const d = data.nextTrainBatch(1000);
return [
d.xs.reshape([1000, 28, 28, 1]),
d.labels,
]
})
// 准备验证集
const [testXs, testYs] = tf.tidy(() => {
const d = data.nextTrainBatch(200);
return [
d.xs.reshape([200, 28, 28, 1]),
d.labels,
]
})
await model.fit(trainXs, trainYs, {
validationData: [testXs, testYs],
epochs: 50,
callbacks: tfvis.show.fitCallbacks(
{name: '训练效果'},
['loss', 'val_loss', 'acc', 'val_acc'],
{callbacks: ['onEpochEnd']}
)
});
// 添加画板
const canvas = document.querySelector('canvas');
canvas.addEventListener('mousemove', (e) => {
if(e.buttons === 1) {
const ctx = canvas.getContext('2d');
ctx.fillStyle = 'rgb(255,255,255)';
ctx.fillRect(e.offsetX, e.offsetY, 25, 25);
}
})
// 清除画板
window.clear = () => {
const ctx = canvas.getContext('2d');
ctx.fillStyle = 'rgb(0,0,0)';
ctx.fillRect(0, 0, 300, 300);
}
clear();
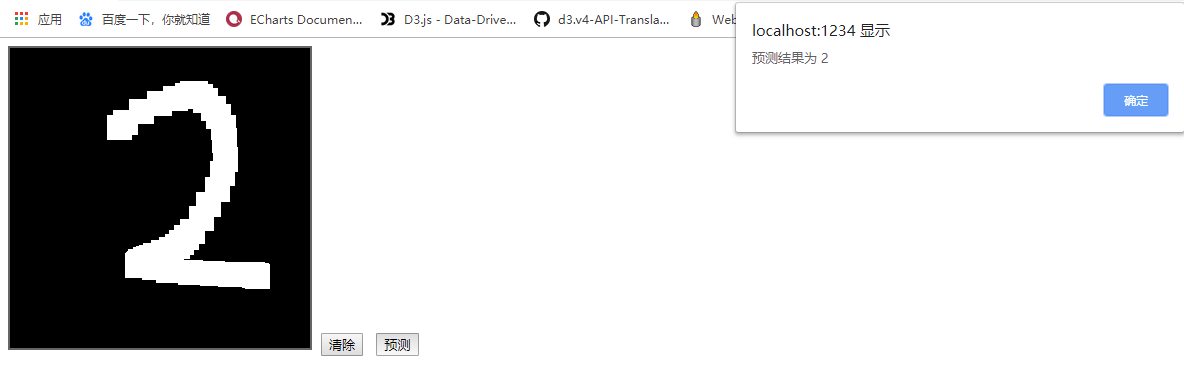
// 进行预测
window.predict = () => {
const input = tf.tidy(() => {
// 将图片大小缩小到28
return tf.image.resizeBilinear(
// 将canvas转换成像素
tf.browser.fromPixels(canvas),
[28, 28],
true
)
// 进行切割,将图片变成黑白的
.slice([0,0,0], [28,28,1])
// 做归一化
.toFloat()
.div(255)
.reshape([1, 28, 28, 1])
})
const pred = model.predict(input).argMax(1);
alert(`预测结果为 ${pred.dataSync()[0]}`);
}
}
1
2
3
4
5
6
7
8
9
10
11
12
13
14
15
16
17
18
19
20
21
22
23
24
25
26
27
28
29
30
31
32
33
34
35
36
37
38
39
40
41
42
43
44
45
46
47
48
49
50
51
52
53
54
55
56
57
58
59
60
61
62
63
64
65
66
67
68
69
70
71
72
73
74
75
76
77
78
79
80
81
82
83
84
85
86
87
88
89
90
91
92
93
94
95
96
97
98
99
100
101
102
103
104
105
106
107
108
109
110
111
112
113
114
115
116
117
118
119
120
121
122
123
124
125
126
127
128
129
130
131
132
133
134
135
136
137
138
139
140
141
142
143
144
145
146
147
148
149
150
151
152
153
154
155
156
157